Jun 23, 2015
Van Lindberg, chair of the Python Software Foundation, recently tweeted 1 2 3 4 5 a list of security best practices. For my information and future reference, I’m gathering them here.
- Thorough negative testing. Cause failures with test cases.
- Fuzz with address checking and standard alloc
- Compiling with address checking and standard memory alloc
- Focused manual spotcheck validation of fields
- Fuzzing w/ output examination
- Context-sensitive source code analysis
- Multi-implementation tests
- Aggressive, not compiled out runtime assertions
- Implementations in safer languages
- Static analysis
- Thorough human review/audit
- Formal methods
Use more than 1.
Update 2015-06-23 14:11
Van mentionned that this list was from David Wheeler. Thanks! David’s Secure Programming HOWTO is an essential reference.
Jun 15, 2015
Introduction
Python comes with a very useful debugger called pdb. The iPython project provides an enhanced version of pdb called ipdb. The ipdb debugger provides the same standard debugging commands as pdb, and it includes some nice additional features such as tab completion.
Installation
Install ipdb from the Python Package Index.
On Windows, you have to install the pyreadline library as well
Basic debugging
Let’s step through a very simple Python program. Add this to a file called example.py
def main():
    """
    Main function
    """
    x = 34
    y = 3
    z = y/x
    print(x,y,z)

if __name__ == '__main__':
    main()
Run it, wrapped in the ipdb debugger.
If you are using Python 3, the debugger script is called ipdb3 instead of ipdb
The debugger starts up, and waits at the first line.
> /home/example.py(1)<module>()
----> 1 def main():
      2     """
      3     Main function
First, let’s get help on what commands are available. Type ? and press enter.
ipdb> ?

Documented commands (type help <topic>):
========================================
EOF    bt         cont      enable  jump  pdef    psource  run      unt
a      c          continue  exit    l     pdoc    q        s        until
alias  cl         d         h       list  pfile   quit     step     up
args   clear      debug     help    n     pinfo   r        tbreak   w
b      commands   disable   ignore  next  pinfo2  restart  u        whatis
break  condition  down      j       p     pp      return   unalias  where

Miscellaneous help topics:
==========================
exec  pdb

Undocumented commands:
======================
retval  rv
More help is available for each command.
ipdb> ?s
s(tep)
Execute the current line, stop at the first possible occasion
(either in a function that is called or in the current function).
Basic usage
Step through the program with s until you get past the line where 34 is assigned to x.
Now that we’re here, let’s see what value x holds. Type x and ipdb will display the value of x.
Set a breakpoint
ipdb> b 8
Breakpoint 1 at /home/example.py:8
Use c to continue execution until that breakpoint.
Use q to quit out of the debugger.
iPython additions
ipdb adds some useful features above what plain pdb provides. The most useful is tab-completion. Any identifiers that are defined in locals() or in globals() can be tab-completed.
The “magic” commands (%, ??) from the regular iPython shell are not available in ipdb. Instead, ipdb provides some extra debugger commands, prefixed with a “p”. pinfo obj is the same as obj? in the iPython shell.
Step in to example.py, past the definition of main(). Type pinfo main
ipdb> pinfo main
Signature: main()
Docstring: Main function
File:      ~/example.py
Type:      function
This shows us some useful information about the main() function.
psource will display the source of an object.
ipdb> psource main
def main():
    """
    Main function
    """
    x = 34
    y = 3
    z = y/x
    print(x,y,z)
Further reading
We have just scratched the surface of pdb and ipdb. There is good information available right in the debugger,
available by typing ?pdb.
For more information about plain pdb and its commands, the “Python Module of the Week” series did a nice introduction.
Alternatives
The pudb debugger presents a more visual display, with separate panes for breakpoints and local variables. It is available on Linux and OS X.
For more intractable problems, the Linux strace utility traces all system calls made by a program. It can attach to an already-running process, and can capture all the file and network input and output.
strace -o output.txt python example.py
grep example output.txt
This shows us all the occurrences of the word ‘example’ in the system calls that happen when we run python example.py
execve("/home/.virtualenvs/test/bin/python", ["python", "example.py"], [/* 36 vars */]) = 0
readlink("example.py", 0x7ffe244a2fe0, 4096) = -1 EINVAL (Invalid argument)
lstat("/home/example.py", {st_mode=S_IFREG|0664, st_size=135, ...}) = 0
stat("example.py", {st_mode=S_IFREG|0664, st_size=135, ...}) = 0
open("example.py", O_RDONLY)            = 3
stat("example.py", {st_mode=S_IFREG|0664, st_size=135, ...}) = 0
open("example.py", O_RDONLY)            = 3
Let’s remove read permissions for example.py
If we run our strace again, we see that the open syscall now returns an error.
execve("/home/virtualenvs/test/bin/python", ["python", "example.py"], [/* 36 vars */]) = 0
readlink("example.py", 0x7ffc15852b60, 4096) = -1 EINVAL (Invalid argument)
lstat("/home/example.py", {st_mode=S_IFREG|0220, st_size=135, ...}) = 0
stat("example.py", {st_mode=S_IFREG|0220, st_size=135, ...}) = 0
open("example.py", O_RDONLY)            = -1 EACCES (Permission denied)
stat("example.py", {st_mode=S_IFREG|0220, st_size=135, ...}) = 0
open("example.py", O_RDONLY)            = -1 EACCES (Permission denied)
write(2, "python: can't open file 'example"..., 67) = 67
Chad Fowler and Julia Evans have written good introductions to strace.
Jun 10, 2015
The Problem
pylint installs a pytest script, and pytest installs a py.test script. Confusing.
The pylint code quality checker installs the logilab-common package. logilab-common provides a module called pytest. That’s awfully close to the py.test script that the pytest project provides. I can never remember which one to use, when I have both pylint and pytest installed. Fortunately, the logilab-common package has marked its pytest module as “to be deprecated”, so the confusion might be fixed someday.
Investigating using strace
I knew the pytest project was supplying the py.test script, but I did not know where the unwanted pytest script was coming from. strace to the rescue!
$ strace -o trace.txt -e open pytest --help
$ grep pytest trace.txt

open("/home/me/.virtualenvs/dev/bin/pytest", O_RDONLY) = 3
open("/home/me/.virtualenvs/dev/bin/pytest", O_RDONLY) = 3
open("/home/me/.virtualenvs/dev/local/lib/python2.7/site-packages/logilab/common/pytest.x86_64-linux-gnu.so", O_RDONLY) = -1 ENOENT (No such file or directory)
open("/home/me/.virtualenvs/dev/local/lib/python2.7/site-packages/logilab/common/pytest.so", O_RDONLY) = -1 ENOENT (No such file or directory)
open("/home/me/.virtualenvs/dev/local/lib/python2.7/site-packages/logilab/common/pytestmodule.so", O_RDONLY) = -1 ENOENT (No such file or directory)
open("/home/me/.virtualenvs/dev/local/lib/python2.7/site-packages/logilab/common/pytest.py", O_RDONLY) = 3
open("/home/me/.virtualenvs/dev/local/lib/python2.7/site-packages/logilab/common/pytest.pyc", O_RDONLY) = 4
Here we see that the pytest.py file is in the logilab/common directory, so we know what package installed it.
For a fun intro to strace, see Julia Evans’ strace zine.
May 18, 2015
Recap
In Part 1, we set up Twisted. In Part 2, we configured Twisted to run as a Windows service. Now, we will assign the right permissions to the account that the service is using.
Windows file permissions
Windows implements file-level security through access control lists. Windows provides the icacls utility to query and set permissions at the command line.
For example
icacls C:\PythonEnvs\Example /grant "nt service\my_service":(OI)(CI)RX
Let’s break this down:
C:\PythonEnvs\Example - The folder you want to change permissions on/grant - Grant rights additively"nt service\my_service" - The name of the virtual service account(OI)(CI) - Applies the grant recursively to this folder, subfolders, and filesRX - Grants Read and Execute access
Inheritance mode
Inherited folder permissions are specified as:
- OI - Object inherit - This folder and files (no inheritance to subfolders)
- CI - Container inherit - This folder and subfolders
- IO - Inherit only - The ACE does not apply to the current file/directory
These can also be combined:
- (OI)(CI) this folder, subfolders, and files
- (OI)(CI)(IO) subfolders and files only
- (CI)(IO) subfolders only
- (OI) (IO) files only
So BUILTIN\Administrators:(OI)(CI)F means that both files and subfolders will inherit ‘F’ (Full Control)
Similarly (CI)R means folders will inherit ‘R’ (Read folders only = List permission)
SS64 has a good reference for the icacls options.
Troubleshooting permissions
Many Windows admin tasks require the wonderful Sysinternals tools, written by Mark Russinonvich. The first thing I do on a new Windows server is download the Sysinternals Suite and put it on the system path. For this troubleshooting section, I’ll be using the psexec tool.
Whenever a service is not working, it’s helpful to try running it by hand, in the same user account and environment that the service is trying to run in. As far as I know, there is no way to run commands manually as a virtual service account (NT SERVICE\my_service). Put another way, there is no equivalent of su - <user> that can be used for virtual service accounts. However, we can approximate it. We can use psexec to run commands as the LocalService account (NT AUTHORITY\LocalService). It’s far from perfect, but if we can get it working under the LocalService account, chances are we can then get it working under a virtual service account.
Let’s look at some steps we can take to investigate permissions problems. First, open a new admin command prompt. On Windows 8 and newer, “Win-x then a” is a quick way to open an admin command prompt.
Here’s how to execute a single command, under the LocalService account.
psexec -u "NT AUTHORITY\LocalService" C:\PythonEnvs\Example\Scripts\pip freeze
The -u option tells psexec what user to run as. The rest of the line is the command that you want psexec to run. Notice that we pass the full path to the pip inside the virtualenv. pip freeze prints a list of the packages that are installed.
If you get a “Couldn’t install PSEXESVC service” error, try running psexec as administrator.
Here’s another example. We’re telling Python to import the pyodbc module, and print “ok” if it succeeds.
psexec -u "NT AUTHORITY\LocalService" C:\PythonEnvs\Example\Scripts\python -c "import odbc; print 'ok'"
Here’s how to start a new interactive shell in a new window, running as the LocalService user.
psexec -u "NT AUTHORITY\LocalService" -i cmd /k
It should look something like this.
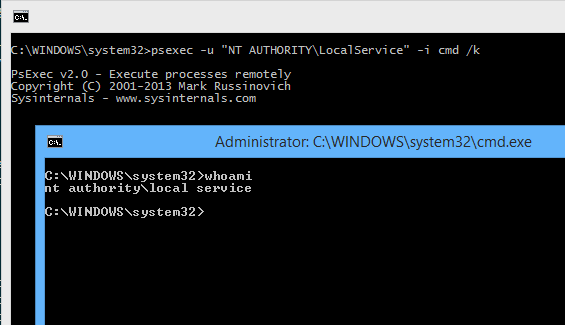
In the screenshot above, I have used the whoami command to show that, in the new console window, we are running as NT AUTHORITY\LocalService.
If you want to start a new interactive session as a different user, but stay in your current command window, omit the -i argument to psexec.
psexec -u "NT AUTHORITY\LocalService" cmd /k
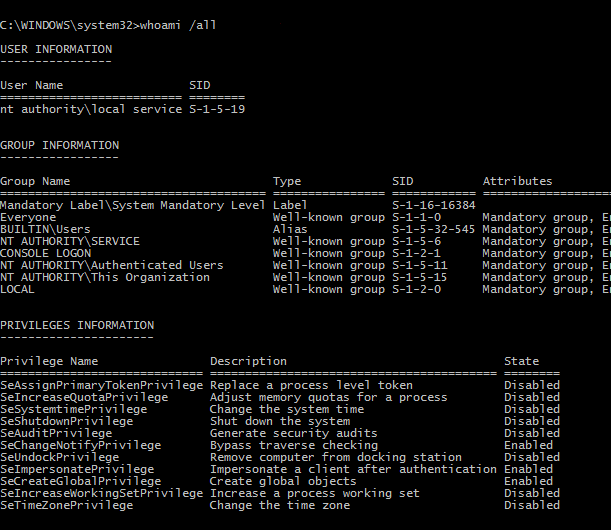
Since Windows does not print the username in the shell prompt, it can be hard to know what user you are running as. Use the whoami command to see the current user.
The whoami /all command shows a lot of useful information about the user, groups and privileges.
Two things to keep in mind when using psexec to troubleshoot. One, it must be called from an admin command prompt (Win-x then a). Two, you can not use psexec to run commands as a virtual service account.
When I’m setting up Windows service, I configure it to run under the LocalService account at first, and I use psexec to track down any permissions problems. Then I switch the service over to a virtual service account. I grant the virtual service account the same privileges that I granted to the LocalService account.
Zip files
You may find that the virtual service accounts you’re using to run the services don’t have permission to handle zip files. This may be due to a policy restriction set by your network administrator. The LocalService account may have the same restriction.
This is why, when I’m installing pyodbc, I have to pass the --always-unzip option to easy_install. Otherwise, easy_install installs it as a zip file, and the virtual service account doesn’t have permission to read it.
Another example: on Windows, distutils packages source distributions as zip files. Let’s say for example you’re running python’s simpleHTTPServer as a Windows service (using nssm), running it as account nt service\package_server. You can visit http://localhost:8000 and you get a nice file listing. However, if you try to download one of the zip files, you get a 404. Assigning permissions for nt service\package_server doesn’t work - the permissions apply to folders and text files but they don’t apply to zip files through inheritance. It only works if you assign read permission specifically for the zip file itself.
Here’s a command to specifically assign permissions for a zip file
icacls "C:\PackageServer\www\downloads\My_Package-0.0.1.zip" /grant "nt service\package_server":R
By your leave
We’ve come to the end of Part 3. The virtual service account under which the service is running has been assigned the permissions it needs.
Note that these commands can be used for any service you are running on Windows, not only those using Twisted or NSSM.
Thanks for following along, and find me on Twitter at @christianmlong if you have any suggestions or fixes.
Apr 21, 2015
Recap
In Part 1, we installed Twisted, and set it up to run inside a virtualenv. Now, we will configure Twisted to run as a Windows service, under a virtual service account.
Install NSSM
With some coding, Twisted applications can run as a Windows service. However, instead of doing that, I’m running my application under NSSM, the Non-Sucking Serivce Manager. This handy application allows you to run any command-line application as a Windows service.
Download NSSM and unzip it. In this example, I’m using NSSM version 2.24, so the folder name is nssm-2.24. Change these intructions as needed to match the version of NSSM you are installing. Move the nssm-2.24 folder to C:\Program Files. Add this to the system Path:
C:\Program Files\nssm-2.24\win64
Note that we are using the 64-bit version of NSSM, even though the application we are installing is running on 32-bit Python. The 64-bit version of NSSM can manage both 64-bit and 32-bit applications.
The nssm.exe file might be marked as untrusted. You can unblock it by right-clicking on the file and choosing Properties. In the Properties dialog, click Unblock.
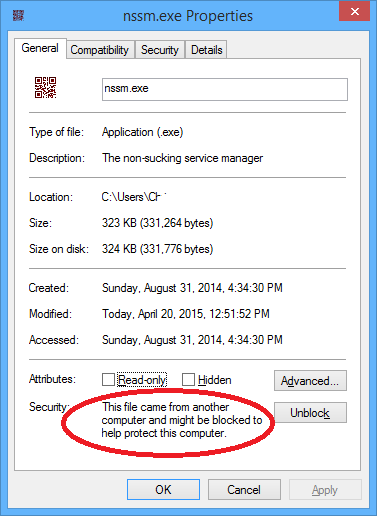
More information about unblocking files in Windows.
NSSM command line
We will use the NSSM command line tools to configure the new service. The NSSM commands look like this:
nssm [nssm command] [service name] [arguments]
Type nssm help to get an overview of the commands. If you get a “not recognized” error from the shell, add NSSM to your path. Changes to the path don’t apply to already-open command windows, so open a new command window after changing the path.
Running nssm commands requires admin privileges.
Create the Windows service
The following commands assume that you have created a virtualenv called “Example”, as described in Part 1. Change these commands as needed to match the name of your service and your virtualenv. You have to quote paths if they contain spaces.
Start a new admin command prompt (Win-x then a):
nssm install my_service ^
    C:\PythonEnvs\Example\Scripts\python.exe ^
    "C:\PythonEnvs\Example\Scripts\twistd.py --python my_tacfile.tac"
For readability, I have broken this long command in to multiple lines using ^, the dos line-continuation character.
This will install a service called my_service.
Look at the paths in the command above. Instead of specifying the system-wide python.exe (C:\Python27\python.exe), we give the path to a python.exe in the Scripts folder of our virtual environment. This has the same effect as calling activate in an interactive session. The Python interpreter will have access to all the packages installed in that virtual environment.
We also have to specify the full path to twistd.py. This file comes with Twisted; it starts the server process.
However, we don’t need to specify the full path to my_tacfile.tac. This is because we specify a working directory for the Windows service, as covered in the next section.
The Windows service has been created, but we still need to configure it. Stay in the admin command prompt, and type:
nssm set my_service AppDirectory C:\PythonEnvs\Example\Lib\site-packages\my_app
In the above example, replace my_app with your app name (it’s the name you used when you did pip install). Check that directory; it should contain your .tac file.
By setting the AppDirectory config variable, we are telling NSSM to make that directory the current working directory before starting the service. That is why we did not need to specify the full path to my_tacfile.tac when we installed the service.
This is the equivalent of passing the --chroot option to twistd.
Set display name and description
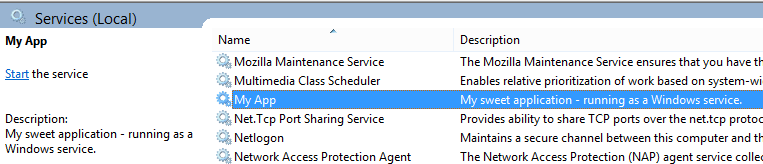
nssm set my_service DisplayName "My App"
nssm set my_service Description "My sweet application - running as a Windows service."
The display name and description will show up in the Windows service Manager console.
nssm set my_service Start SERVICE_DELAYED_AUTO_START
This setting tells the Windows service to start automatically when the server restarts. The NSSM docs have more information about the possible startup options.
Which account should we use?
There are a number of accounts you can use to run your Windows service. It is a good idea to run network services under the least-privileged account possible. For that reason, a user account is not a good choice.
Windows provides some built-in accounts for this purpose:
-
The LocalSystem account (NT AUTHORITY\SYSTEM) is still quite privileged.
-
The NetworkService account (NT AUTHORITY\NetworkService) allows the service to access network resources on the Windows network. However, we don’t need to run as the NetworkService account if we are just serving local resources.
-
The LocalService account (NT AUTHORITY\LocalService) has traditionally been the account Windows sysadmins used for services. It does, however, have some drawbacks. There is only one LocalService account per machine. Let’s say you want to set up multiple services per server (a database and a web server, for example). If you assign permissions to the LocalService account for the benefit of one service, those permissions are shared by all the services that use that account.
None of these are ideal. We’re going to be using a different account type, covered in the next section.
Virtual service accounts
In Windows Server 2008 R2, Microsoft introduced a new kind of account for this purpose, called a “Virtual Service Account”. These accounts are automatically created, one for each Windows service. By default, they have few privileges. And, if you assign privileges to a virtual service account, those privileges apply only to that service and that account. Other services on the same machine do not get those privileges.
Virtual service accounts have the same name as the service they apply to. So, for a service called my_service, the account name would be NT SERVICE\my_service.
Virtual service accounts are not especially well documented. This Microsoft TechNet article is a good reference. There’s no conveniently-located anchor tag in that document, so scroll down to the section titled “Using virtual accounts”. Here’s another article. Again, scroll down to the section titled “Virtual Accounts”.
Ignore everything about “Managed service accounts”. Virtual service accounts and Managed service accounts are often lumped together in the documentation.
Set the account
Because of the advantages listed above, I use virtual service accounts to run my Twisted services on Windows 2012 R2. Virtual service accounts are available on Windows Server 2008 and later.
NSSM can not currently configure services to use virtual service accounts. I contacted the developer, and he said he is interested in adding support.
However, we can use good old sc to configure the service to use the virtual service account. sc is the service manager command line utility that comes with Windows.
sc config my_service obj= "NT SERVICE\my_service"
Yes, that is a space after the equals sign. sc is very particular. SS64 has a good reference for sc.
NSSM workaround
NSSM doesn’t know about virtual service accounts, so it will complain if you use it to configure a service that has been set to use a virtual service account. As a workaround, use sc to temporarily set the account back to LocalSystem.
For example:
Use sc to set the user to something NSSM understands
sc config my_service obj= "LocalSystem"
Use nssm to configure your service
nssm set my_service Description "A better description"
Use sc to set the user back to the virtual service account
sc config my_service obj= "NT SERVICE\my_service"
You don’t have to do it this way. Once you create the Windows service with NSSM, you can configure that service with the traditional Windows service configuration tools.
Start it up
This is what it should look like
C:\WINDOWS\system32>nssm start my_service
my_service: START: The operation completed successfully.
The service prorperties dialog should look like this:
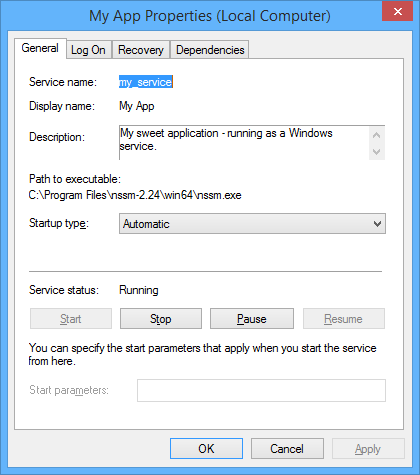
Notice our service is running, and is set to start automatically.
Update
Updated 2015-05-19
Via email, Michael Schlenker points this out:
Virtual Service Accounts can have the ‘Logon as a Service’ right removed via
Group Policy, which leads to weird errors. It is actually a recommended step
for security hardening certain Windows servers (as you don’t want to have
random services running).
Good point, and thanks for the feedback.
At your service
We’ve come to the end of Part 2. We have a Twisted application running as Windows service. It is running under a virtual service account.
Of course, virtual service accounts can be used for any service you are running on Windows, not only those using Twisted or NSSM.
In the next part, we will configure the right privileges for the account. Thanks for following along, and find me on Twitter at @christianmlong if you have any suggestions or fixes.
Apr 21, 2015
With a bit of wrangling, I got Pelican working to manage my blog. Pelican is a static site generator written in Python. It can handle reStructuredText, Markdown, or AsciiDoc formats.
The next question is, what theme to use? The Pelican theme gallery is helpful here. I debated between these themes:
For now, I’m using Built Texts. It’s as easy as setting
THEME = /path/to/built-texts
in your pelicanconf.py.
Also, make sure that you set
SITEURL = ''
in pelicanconf.py. Otherwise, your local preview site will try to load resoureces (css, etc.) from the url of your published site.
Apr 21, 2015
This blog is running on Pelican. It’s pretty slick, and here are a few tips I use to make writing and publishing faster and easier.
New post
I have this shell script accessible via an alias nbp.
 1
 2
 3
 4
 5
 6
 7
 8
 9
10
11
12
13
14
15
16
17 | #!/bin/bash
set -eu
DRAFTS_DIR=~/projects/personal/blog/drafts
if [ -z "$1" ] ; then
FILE_NAME='new_post'
else
FILE_NAME="$1"
fi
SKEL_FILE=$DRAFTS_DIR/skeleton_post
FILE_PATH=$DRAFTS_DIR/"$FILE_NAME".md
cp --no-clobber $SKEL_FILE $FILE_PATH
vi $FILE_PATH
|
This copies my posting template to a new file in the drafts directory, and opens it for editing in vim.
Dev server
Run this command to start the Pelican development server.
This will automatically regenerate the site when files are changed. It will also serve the site at http://localhost:8000.
Run develop_server.sh stop to stop the development server.
Browser auto refresh
There are many auto-refresh solutions for the browser, but they don’t work well when you are editing a file on a remote server. live.js is a nice solution that takes care of auto-refreshing in javascript. However, we don’t want to include the live.js javascript file in the published version, just in the local development version. We can modify our theme to include it only when developing.
First edit pelicanconf.py. Add this
IS_DEVELOPMENT_VERSION = True
Also edit publishconf.py. Add this
IS_DEVELOPMENT_VERSION = False
Now, change the theme so that every article page includes the live.js javascript, if we are in development. Find your theme’s template directory. It’s probably at themes/<theme name>/templates. Edit article.html. Look for the head block in the template {% block head %}. Add this to it:
{% if IS_DEVELOPMENT_VERSION %}
  <script type="text/javascript" src="http://livejs.com/live.js"></script>
{% endif %}
Run make devserver, and open http://localhost:8000. Edit one of your articles, and see if it reloads in the browser automatically. Neat!
The nice thing about the live.js solution is that it works even if the files you are editing are on a remote server. It polls the page by making a head request every few seconds. Obviously, you don’t want this polling to happen on your published pages.
Mar 25, 2015
Intro
Installing and configuring Twisted on Windows has gotten easier over the years. Here is how to do it in 2015, using the latest packaging tools.
Twisted runs well on Windows, in my experience. I moved some Twisted applications from Linux to Windows for a client, and they have been running happily for months now without issue.
These instructions have been tested with Windows 8.1 and Windows Server 2012 R2. The applications I run on Windows use Twisted.Web to serve single-page web apps, talking to a database using pyodbc. My ODBC driver is 32-bit, so I’m using 32-bit Python for these instructions. However, Twisted does not depend on pyodbc, so don’t install it if you don’t need it.
These instructions assume that you already have an application that runs on Twisted. The Twisted documentation has a good explanation of how to set up your project so it runs as a Twisted Applicaion. It also includes an nice selection of example applications, if you don’t have an existing Twisted application.
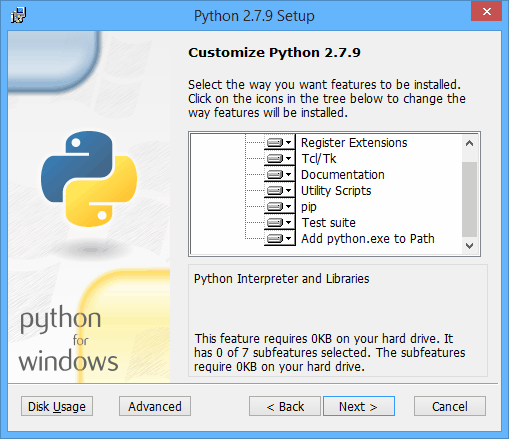
Install Python
Twisted requires Python 2. Install the latest version of Python 2.7 (direct link to the 32-bit installer). Run the installer, and in the installer dialog, choose the option to add python to the path.
Install a compiler
Some of Twisted’s dependencies have C extensions, and are not available from the Python Package Index in the binary wheel format. So, we need a compiler to compile them from source. This used to be tricky, but fortunately, Microsoft now provides a free download that makes it easy. Download the Microsoft Visual C++ Compiler for Python 2.7. It may have to be installed as admin, to get around policy restrictions on compilers.
Upgrade pip and virtualenv
The Python 2.7.9 installer now includes pip and virtualenv, and sets them up for you by default. However, it does not come with the very latest pip and virtualenv. Here’s how to upgrade them to the latest versions.
Start an admin command prompt. On Windows 8 and newer, Win-x then a is a quick keyboard shortcut to open an admin command prompt.
Upgrade pip to the latest version.
python -m pip install --upgrade pip
Upgrade virtualenv to the latest version.
pip install --upgrade virtualenv
Now close the admin command prompt. We will be installing the rest of the packages in to a virtualenv, and that does not require admin access. The great advantage of using a virtualenv is that it keeps the packages we install isolated from each other, and from the system-wide packages.
Set up a virtual environment
Start a regular (non-admin) command prompt. Win-x then c is a quick keyboard shortcut for a non-admin command prompt.
mkdir C:\PythonEnvs
virtualenv C:\PythonEnvs\Example
C:\PythonEnvs\Example\Scripts\activate.bat
This makes a new directory on the C: drive, makes a new virtualenv, and then activates the new virtualenv. You should see the name of the virtualenv in parentheses at the start of your command prompt, something like this:
When a virtualenv is activated, it looks for installed Python packages in its own site-packages directory C:\PythonEnvs\Example\Lib\site-packages, instead of looking in the system wide site-packages directory C:\Python27\Lib\site-packages. Note that we don’t need to be in the virtualenv directory for it to be active.
The virtualenvwrapper project is full of useful shortcuts for working with virtualenvs. For simplicity, I will be using only virtualenv, and not virtualenvwrapper, in this writeup. However, if you’re interested in setting up virtualenvwrapper, this patched version works on Windows with the latest version of virtualenv.
The state of Python packaging in 2015
Installing Python packages on Windows has gotten a lot easier over the years. The Python Package Index (PyPI) now provides pre-compiled binary installers in the wheel format for many packages.
When a wheel is not available, pip can automatically compile C extensions using this compiler that Microsoft provides at no cost.
However, there are still packages that are not available on PyPI. Many are distributed for Windows in the Windows installer format (.msi or .exe). Pip can not install these packages, but there is a way to install them in to a virtualenv.
Install Twisted
This will pull the latest version from PyPI. It will also install its dependencies. One dependency, zope.interface, will use the compiler to compile a C extension.
. . .
Installing collected packages: zope.interface, Twisted
  Running setup.py install for zope.interface
    building 'zope.interface._zope_interface_coptimizations' extension
. . .
If you get a vcvarsall error, install the Microsoft Visual C++ compiler.
Install dependencies from PyPI
Install pywin32.
As of March 2015, pywin32 is available on PyPI in the wheel format. That means it can be installed by pip. Note that in order to get the PyPI version, we must tell pip to install package pypiwin32, not pywin32.
Install dependencies that are not on PyPI
For packages that are not on PyPI, the installation steps are different. If the package is distributed using a Windows binary installer (.msi or .exe) we can use the older easy_install command to install it in to a virtualenv.
One such package is pyodbc, which my application uses to talk to the database. Twisted itself does not depend on pyodbc, so there is no need to install it if your application doesn’t use it.
As of March 2015, pyodbc is not available in wheel format from PyPI.
Download the Windows installer. Make sure to get the installer that matches your version of Python and your architecture. I am using this one “3.0.7 32-bit Windows Installer for Python 2.7”.
Use easy_install to install pyodbc in to the virtualenv from the executable Windows installer file.
easy_install --always-unzip C:\Path\to\pyodbc-3.0.7.win32-py2.7.exe
I’ll talk about why we need --always-unzip in Part 3.
Not all installers will work with easy_install this way. See this Stack Overflow question for more details.
Twisted Application
In this series, I’m assuming you have your project structured as a Twisted Application. In that structure, you have a .tac file that is the connection point between your code and the Twisted server, twistd.
Here a basic .tac file, taken from the documentation for Twisted Application.
service.tac
# You can run this .tac file directly with:
#    twistd -ny service.tac

"""
This is an example .tac file which starts a webserver on port 8080 and
serves files from the current working directory.

The important part of this, the part that makes it a .tac file, is
the final root-level section, which sets up the object called 'application'
which twistd will look for
"""

import os
from twisted.application import service, internet
from twisted.web import static, server

def getWebService():
    """
    Return a service suitable for creating an application object.

    This service is a simple web server that serves files on port 8080 from
    underneath the current working directory.
    """
    # create a resource to serve static files
    fileServer = server.Site(static.File(os.getcwd()))
    return internet.TCPServer(8080, fileServer)

# this is the core part of any tac file, the creation of the root-level
# application object
application = service.Application("Demo application")

# attach the service to its parent application
service = getWebService()
service.setServiceParent(application)
If you don’t already have a project that you run under Twisted, the documentation has a nice set of examples to get you started.
Install your application
Whatever Twisted application you are going to be running on this server, install it as you normally would. For example:
Now that everything has been installed, check it.
should look something like this:
my_app==4.14.2
pypiwin32==219
Twisted==14.0.2
zope.interface==4.1.2
other dependencies here
. . .
Newer versions of some of these packages may since have been released.
If you are installing using pip, make sure your .tac file is included in your distribution file. For exapmple, put this line in your MANIFEST.in file:
Documentation on MANIFEST.in.
Run it
Try it out. Make sure your virtualenv is activated, and type:
python C:\PythonEnvs\Example\Scripts\twistd.py --help
The virtualenv picks up the right Python path, but on Windows we have to specify the full path to the twistd.py file. This command should give you a nice help message and no errors.
Now try running your app under Twisted.
python C:\PythonEnvs\Example\Scripts\twistd.py ^
   --rundir "C:\PythonEnvs\Example\Lib\site-packages\my_app" ^
   --python "my_tacfile.tac"
For readability, I have broken this long command in to multiple lines using ^, the dos line-continuation character.
This command should print out some lines showing the twistd server starting up. Again, on Windows, we have to specify the full path to the app install directory when starting the twistd server. Go try out your app, and press Ctrl-c to shut down the server when you’re done.
Up and running
That’s it for Part 1. We have installed Python, set up a virtualenv, and gotten your Twisted app up and running. In Part 2, we will set up a Windows service to run the app, using the virtual service account that was introduced in Windows Server 2008. In Part 3, we will look at setting the right privileges for the app. In Part 4, we will package the app and its dependencies for deployment to test and production servers. Thanks for reading, and if you have any questions or suggestions, let me know. I’m on Twitter at @christianmlong.
Mar 04, 2015
The Pelican Themes project gathers together a bunch of nice themes for the Pelican static blog generator.
This is a good case for using git’s submodule feature.
Move to where your Pelican is installed (where your pelicanconf.py file is).
Make sure you are in a git working copy and the status is clean.
Add the pelican-themes repository as a git submodule, and commit the change.
$ git submodule add git@github.com:getpelican/pelican-themes.git themes
$ git commit -am "Add pelican-themes as a submodule"
Now we should see the submodule listed
The pelican-themes project is itself made up of git submodules. Let’s take a look.
Change to the newly-created themes directory, and look at the submodules defined in there
$ git submodule status

-656296ab29a76d980155427f1f1ffe1892966a2a BT3-Flat
-a74606061d62be0f8508ca840375abe52ae24786 Responsive-Pelican
-bd337dffaa8aca10a1757d17385030e3a9d6b835 alchemy
-4ea9f35b517e67488f330799e8637e2e045d657e blue-penguin
. . . etc.
Here git submodule status prints all the submodules that make up the pelican-themes project, one line for each theme.
See the little minus sign before the commit hash on each line? That means that the submodule for that theme
is not initialized. We could initialize all the themes, but that would pull down a lot of code I’m not interested
in. I just want a few themes.
git submodule init blue-penguin
git submodule init pelican-mockingbird
git submodule update
git submodule init initializes the blue-penguin and pelican-mockingbird themes. Then, git submodule update clones the missing submodules.
Then edit your pelicanconf.py file, and add this line, giving Pelican the appropriate path to your theme.
THEME = 'path/to/your/theme'
I’m using the Blue Penguin theme. I made a few modifications.
I’m not justifying the text, and I replaced the dark solarized code formatting with my own format based on the Pygments ‘friendly’ style.
Here’s some code, to show off the syntax highlighting.
from pygments.style import Style
from pygments.token import Keyword, Name, Comment, String, Error, \
     Number, Operator, Generic

class YourStyle(Style):
    default_style = ""
    styles = {
        Comment:                'italic #888',
        Keyword:                'bold #005',
        Name:                   '#f00',
        Name.Function:          '#0f0',
        Name.Class:             'bold #0f0',
        String:                 'bg:#eee #111'
    }
Dec 19, 2014
I’m looking for a new code editor. I have been using Komodo for ten years, and it has been very solid. I’m on Komodo 4 now; I like the project tree, which makes it easy to organize live and static folders, and local and remote files. It offers simple incremental search, and a good, clean interface for global find and replace in all open files.
Unfortunately, later versions of Komodo have introduced some features I can’t get used to. The Project pane was split in to Projects and Places, and it does not work well for managing big projects on remote servers. Also, the incremental search was changed for the worse.
I have been looking at PyCharm. I like its code completion features, and I figured out how to do find and replace in just open files (when doing a find, choose a custom Scope, and choose Open Files). The multiple-cursor editing is better than in Komodo 9 beta: for example alt-click adds a new cursor to the current group. The refactoring support looks great. I’m not a big fan of the way remote files are handled. They are copied down to the local system, and then the editor syncs changes back to the remote system. Also, the backspace key eats up whole indents, not just one space character (bug report). If I wanted tab-like behavior, I’d use tabs!
One other possibility I’m looking at is using cygwin. A full tmux, vim, fish shell and powerline setup would be very nice.