Twisted on Windows, 2015 Edition: Part 2
Recap
In Part 1, we installed Twisted, and set it up to run inside a virtualenv. Now, we will configure Twisted to run as a Windows service, under a virtual service account.
Install NSSM
With some coding, Twisted applications can run as a Windows service. However, instead of doing that, I’m running my application under NSSM, the Non-Sucking Serivce Manager. This handy application allows you to run any command-line application as a Windows service.
Download NSSM and unzip it. In this example, I’m using NSSM version 2.24, so the folder name is nssm-2.24. Change these intructions as needed to match the version of NSSM you are installing. Move the nssm-2.24 folder to C:\Program Files. Add this to the system Path:
C:\Program Files\nssm-2.24\win64
Note that we are using the 64-bit version of NSSM, even though the application we are installing is running on 32-bit Python. The 64-bit version of NSSM can manage both 64-bit and 32-bit applications.
The nssm.exe file might be marked as untrusted. You can unblock it by right-clicking on the file and choosing Properties. In the Properties dialog, click Unblock.
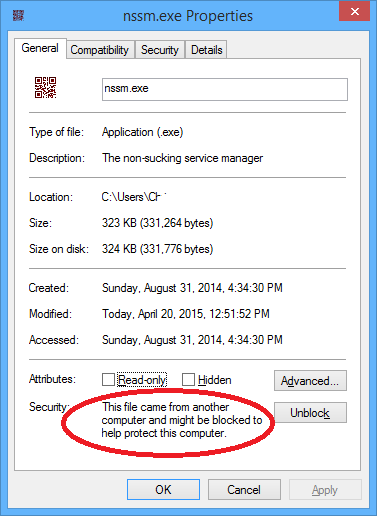
More information about unblocking files in Windows.
NSSM command line
We will use the NSSM command line tools to configure the new service. The NSSM commands look like this:
nssm [nssm command] [service name] [arguments]
Type nssm help to get an overview of the commands. If you get a “not recognized” error from the shell, add NSSM to your path. Changes to the path don’t apply to already-open command windows, so open a new command window after changing the path.
Running nssm commands requires admin privileges.
Create the Windows service
The following commands assume that you have created a virtualenv called “Example”, as described in Part 1. Change these commands as needed to match the name of your service and your virtualenv. You have to quote paths if they contain spaces.
Start a new admin command prompt (Win-x then a):
nssm install my_service ^
    C:\PythonEnvs\Example\Scripts\python.exe ^
    "C:\PythonEnvs\Example\Scripts\twistd.py --python my_tacfile.tac"
For readability, I have broken this long command in to multiple lines using ^, the dos line-continuation character.
This will install a service called my_service.
Look at the paths in the command above. Instead of specifying the system-wide python.exe (C:\Python27\python.exe), we give the path to a python.exe in the Scripts folder of our virtual environment. This has the same effect as calling activate in an interactive session. The Python interpreter will have access to all the packages installed in that virtual environment.
We also have to specify the full path to twistd.py. This file comes with Twisted; it starts the server process.
However, we don’t need to specify the full path to my_tacfile.tac. This is because we specify a working directory for the Windows service, as covered in the next section.
Configure the working directory
The Windows service has been created, but we still need to configure it. Stay in the admin command prompt, and type:
nssm set my_service AppDirectory C:\PythonEnvs\Example\Lib\site-packages\my_app
In the above example, replace my_app with your app name (it’s the name you used when you did pip install). Check that directory; it should contain your .tac file.
By setting the AppDirectory config variable, we are telling NSSM to make that directory the current working directory before starting the service. That is why we did not need to specify the full path to my_tacfile.tac when we installed the service.
This is the equivalent of passing the --chroot option to twistd.
Set display name and description
nssm set my_service DisplayName "My App"
nssm set my_service Description "My sweet application - running as a Windows service."
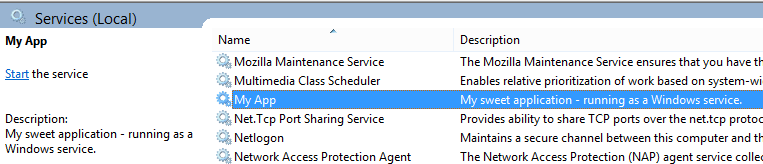
The display name and description will show up in the Windows service Manager console.
Configure startup
nssm set my_service Start SERVICE_DELAYED_AUTO_START
This setting tells the Windows service to start automatically when the server restarts. The NSSM docs have more information about the possible startup options.
Which account should we use?
There are a number of accounts you can use to run your Windows service. It is a good idea to run network services under the least-privileged account possible. For that reason, a user account is not a good choice.
Windows provides some built-in accounts for this purpose:
-
The LocalSystem account (
NT AUTHORITY\SYSTEM) is still quite privileged. -
The NetworkService account (
NT AUTHORITY\NetworkService) allows the service to access network resources on the Windows network. However, we don’t need to run as the NetworkService account if we are just serving local resources. -
The LocalService account (
NT AUTHORITY\LocalService) has traditionally been the account Windows sysadmins used for services. It does, however, have some drawbacks. There is only one LocalService account per machine. Let’s say you want to set up multiple services per server (a database and a web server, for example). If you assign permissions to the LocalService account for the benefit of one service, those permissions are shared by all the services that use that account.
None of these are ideal. We’re going to be using a different account type, covered in the next section.
Virtual service accounts
In Windows Server 2008 R2, Microsoft introduced a new kind of account for this purpose, called a “Virtual Service Account”. These accounts are automatically created, one for each Windows service. By default, they have few privileges. And, if you assign privileges to a virtual service account, those privileges apply only to that service and that account. Other services on the same machine do not get those privileges.
Virtual service accounts have the same name as the service they apply to. So, for a service called my_service, the account name would be NT SERVICE\my_service.
Virtual service accounts are not especially well documented. This Microsoft TechNet article is a good reference. There’s no conveniently-located anchor tag in that document, so scroll down to the section titled “Using virtual accounts”. Here’s another article. Again, scroll down to the section titled “Virtual Accounts”.
Ignore everything about “Managed service accounts”. Virtual service accounts and Managed service accounts are often lumped together in the documentation.
Set the account
Because of the advantages listed above, I use virtual service accounts to run my Twisted services on Windows 2012 R2. Virtual service accounts are available on Windows Server 2008 and later.
NSSM can not currently configure services to use virtual service accounts. I contacted the developer, and he said he is interested in adding support.
However, we can use good old sc to configure the service to use the virtual service account. sc is the service manager command line utility that comes with Windows.
sc config my_service obj= "NT SERVICE\my_service"
Yes, that is a space after the equals sign. sc is very particular. SS64 has a good reference for sc.
NSSM workaround
NSSM doesn’t know about virtual service accounts, so it will complain if you use it to configure a service that has been set to use a virtual service account. As a workaround, use sc to temporarily set the account back to LocalSystem.
For example:
Use sc to set the user to something NSSM understands
sc config my_service obj= "LocalSystem"
Use nssm to configure your service
nssm set my_service Description "A better description"
Use sc to set the user back to the virtual service account
sc config my_service obj= "NT SERVICE\my_service"
You don’t have to do it this way. Once you create the Windows service with NSSM, you can configure that service with the traditional Windows service configuration tools.
Start it up
nssm start my_service
This is what it should look like
C:\WINDOWS\system32>nssm start my_service
my_service: START: The operation completed successfully.
The service prorperties dialog should look like this:
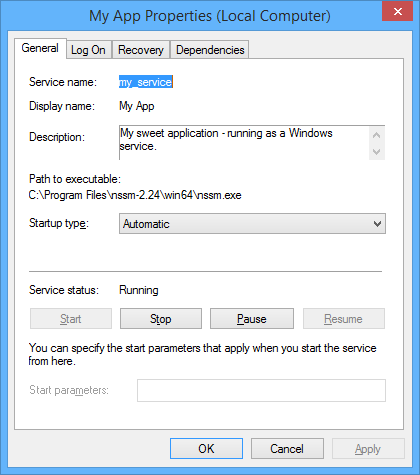
Notice our service is running, and is set to start automatically.
Update
Updated 2015-05-19
Via email, Michael Schlenker points this out:
Virtual Service Accounts can have the ‘Logon as a Service’ right removed via Group Policy, which leads to weird errors. It is actually a recommended step for security hardening certain Windows servers (as you don’t want to have random services running).
Good point, and thanks for the feedback.
At your service
We’ve come to the end of Part 2. We have a Twisted application running as Windows service. It is running under a virtual service account.
Of course, virtual service accounts can be used for any service you are running on Windows, not only those using Twisted or NSSM.
In the next part, we will configure the right privileges for the account. Thanks for following along, and find me on Twitter at @christianmlong if you have any suggestions or fixes.